
Have you ever wondered how to change your hair color in Photoshop? Maybe you want to try a new look, or just have some fun with your photos. Whatever the reason, changing hair color in Photoshop is not as hard as you might think. In this article, we will show you a simple method to change hair color in Photoshop, as well as an online tool that can do it for you in seconds. Let’s get started!
Method to Change Hair Color in Photoshop
To change hair color in Photoshop, you will need to follow these steps:
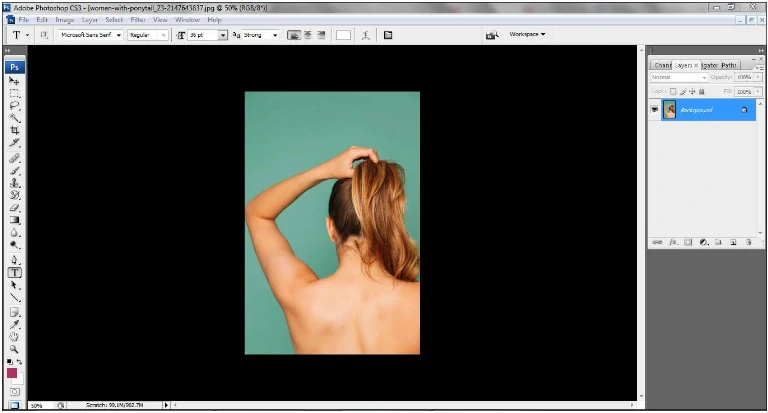
Step 1: Open the file in Photoshop
First, open the image that you want to edit in Photoshop. You can do this by going to File > Open and selecting the image from your computer. Alternatively, you can drag and drop the image into Photoshop.
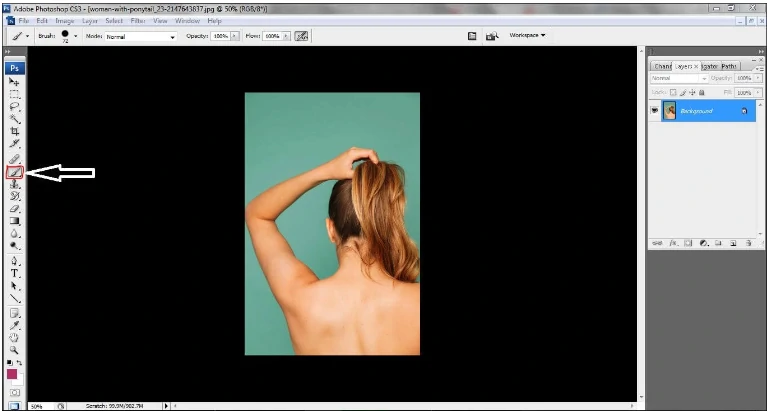
Step 2: Choose the Brush tool
Next, select the Brush tool from the toolbar on the left. You can also press B on your keyboard to activate the Brush tool. The Brush tool allows you to paint over the image with any color you want.

Step 3: Adjust the size of the Brush tool
Before you start painting, you need to adjust the size of the Brush tool to match the width of the hair strands. You can do this by using the bracket keys ([ and ]) on your keyboard to increase or decrease the size of the brush. You can also change the hardness of the brush by right-clicking on the image and moving the slider. A softer brush will create a smoother transition between the original and the new color, while a harder brush will create a sharper edge.
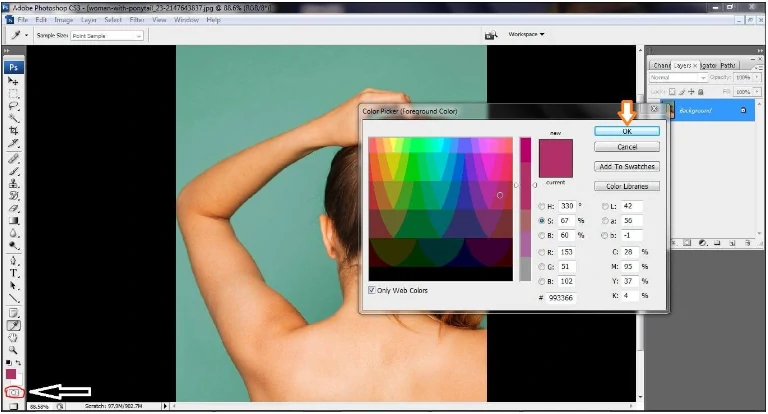
Step 4: Select the color
Now, you need to choose the color that you want to apply to the hair. You can do this by clicking on the foreground color swatch at the bottom of the toolbar. This will open the Color Picker window, where you can select any color you want. You can also use the Eyedropper tool to pick a color from the image or another source. To use the Eyedropper tool, press I on your keyboard and click on the color that you want to copy.
Step 5: Create a new layer
Before you start painting, you need to create a new layer to apply the color. This will allow you to change the mode and opacity of the layer later, as well as erase any unwanted areas. To create a new layer, go to Layer > New > Layer or press Ctrl+Shift+N on your keyboard. Name the layer “Hair Color” and click OK.

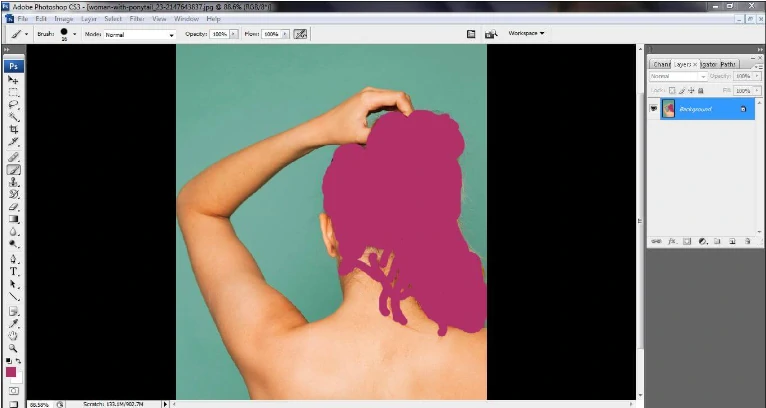
Step 6: Color the hair
Now, you can start coloring the hair with the Brush tool. Make sure that the new layer is selected in the Layers panel on the right. Then, zoom in on the image and start painting over the hair with the color that you chose. Try to follow the direction and shape of the hair strands as closely as possible. You don’t have to be very precise, as you can fix any mistakes later.
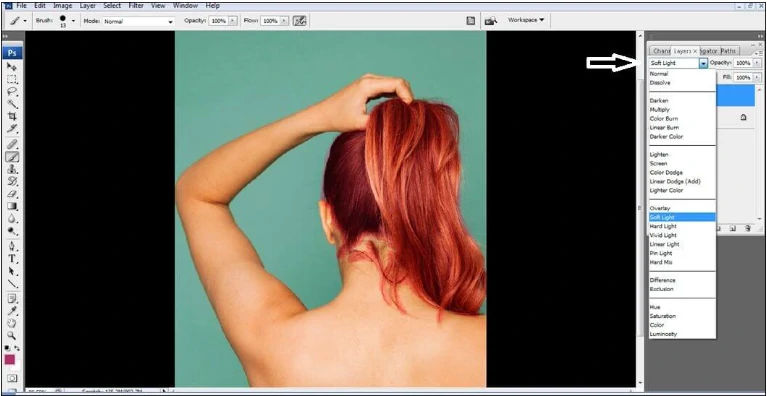
Step 7: Select the mode and opacity
After you have colored the hair, you need to adjust the mode and opacity of the layer to blend the color with the original image. The mode and opacity options are located at the top of the Layers panel. The mode determines how the layer interacts with the layers below it, while the opacity determines how transparent the layer is.
After you have finished applying the color to the hair with the brush tool, you need to choose the appropriate mode for the color. In this example, I have changed the mode from ‘normal’ to ‘soft light’. This gives us the desired hair color, as you can observe.
Step 8: Remove unwanted areas of the image
The final step is to remove any unwanted areas of the image that have been colored by the Brush tool. For example, you may have accidentally colored some parts of the skin, the background, or the clothing. To remove these areas, you can use the Eraser tool or a layer mask.
The Eraser tool allows you to erase parts of the layer that you don’t want. To use the Eraser tool, press E on your keyboard and select the tool from the toolbar. Then, adjust the size and hardness of the eraser, and start erasing the unwanted areas of the image.
A layer mask allows you to hide or reveal parts of the layer without deleting them. To use a layer mask, click on the Add Layer Mask icon at the bottom of the Layers panel. This will create a white rectangle next to the layer thumbnail. A white layer mask means that the entire layer is visible, while a black layer mask means that the entire layer is hidden. To hide parts of the layer, you need to paint them with black. To reveal parts of the layer, you need to paint over them with white. To paint on the layer mask, you can use the Brush tool with black or white as the foreground color.
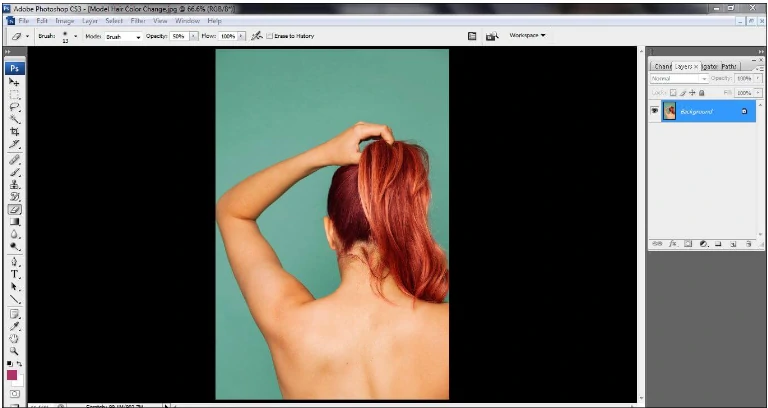
And that’s it! You have successfully changed the hair color in Photoshop. You can experiment with different colors, modes, and opacities to create different effects. You can also save the image as a new file by going to File > Save As and choosing a format and a name for the file.
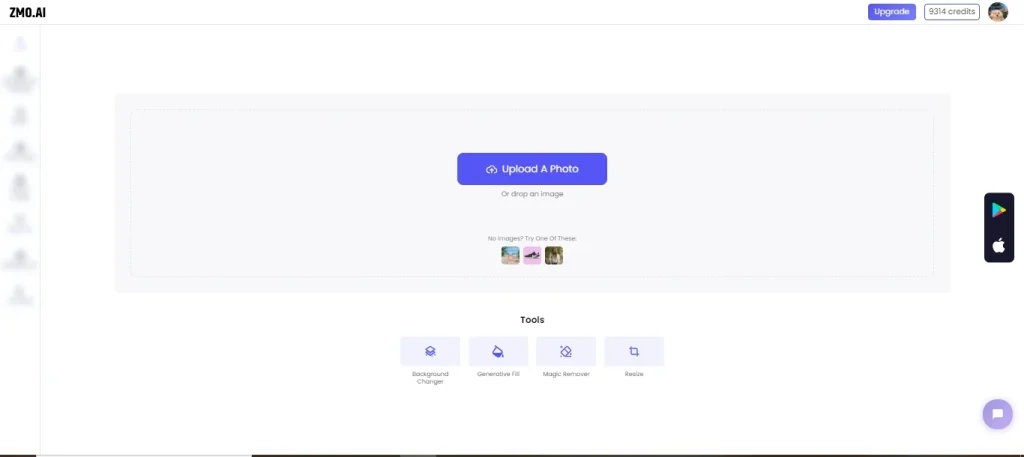
Use Online Tool to Quickly Change Hair Color: ZMO.AI
If you don’t have Photoshop or you want a faster and easier way to change your hair color, you can use an online tool called ZMO.AI. ZMO.AI is an AI-powered photo editor that can help you transform your photos in seconds. One of the features that ZMO.AI offers is the Generative Fill function, which can change the color of any object in your photo, including your hair. To use it, you just need to follow these steps:
Step 1: Select AI photo editor from the menu of the ZMO.AI website.
Go to ZMO.AI and click on the AI photo editor option in the menu. This will take you to the photo editor page, where you can upload your photo or choose one from the gallery.
Step 2: Upload photo.
To upload your photo, click on the Upload button and select the photo from your device. You can also drag and drop the photo to the editor. The photo will appear on the canvas, where you can crop, rotate, or resize it if needed.

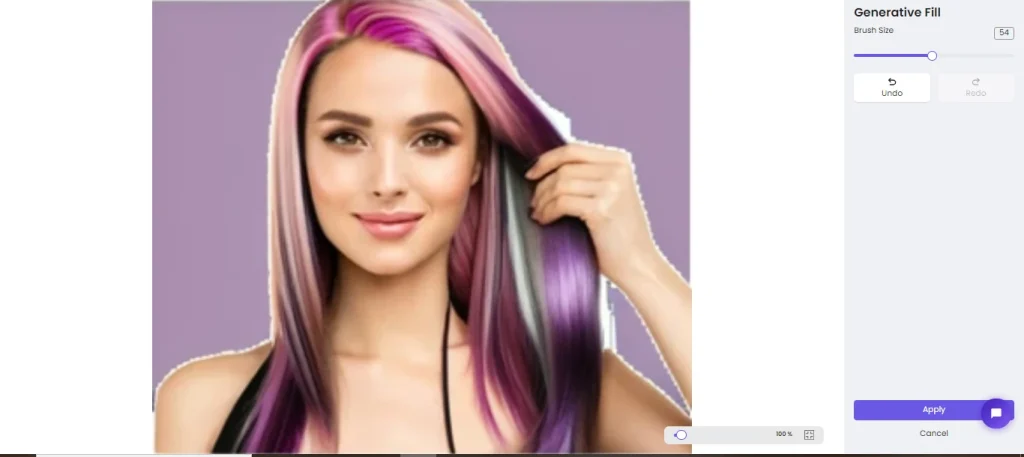
Step 3: Select the Generative Fill button.
To change your hair color, click on the Generative Fill button in the toolbar. This will activate the generative fill mode, which will allow you to select the area that you want to change.
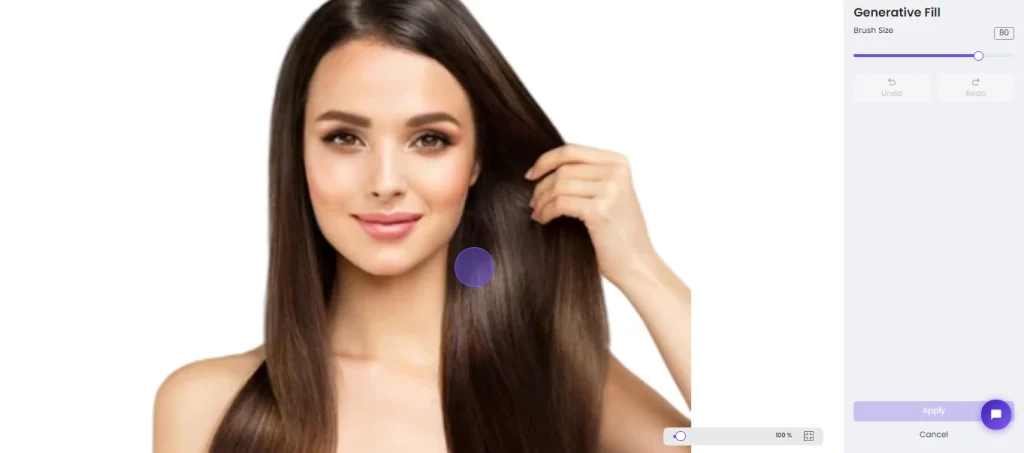
Step 4: Select the area with the mouse.
To select the area, use your mouse to draw a rough outline around your hair. You don’t have to be very precise, as the AI will automatically detect the edges of the hair and fill the area with the new color. You can also use the Eraser tool to remove any unwanted parts of the selection.
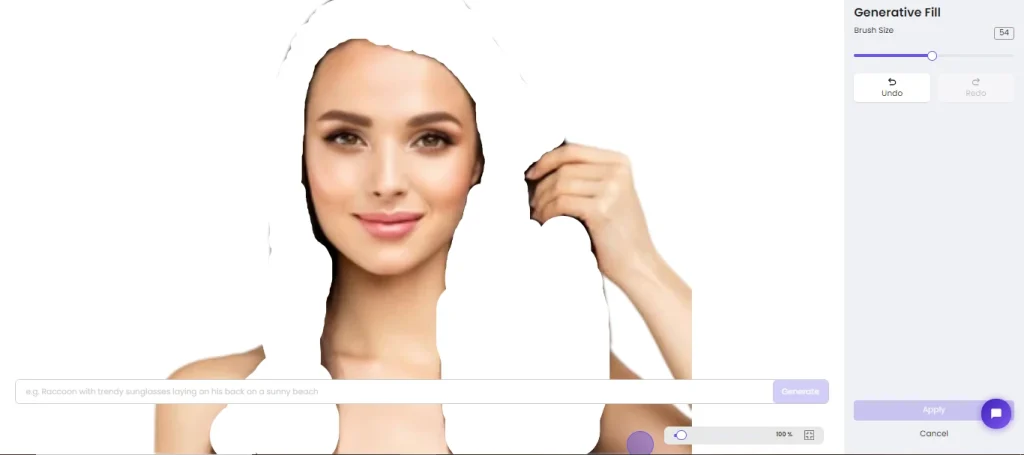
Step 5: Give the prompt.
To choose the new color, you need to give a prompt to the AI. A prompt is a short text that describes what you want the AI to do. For example, if you want to change your hair color to red, you can type “red hair” in the prompt box. You can also use more specific or creative prompts, such as “fire hair”, “rainbow hair”, or “pink hair with purple highlights”. The AI will try to generate the color that matches your prompt as closely as possible.
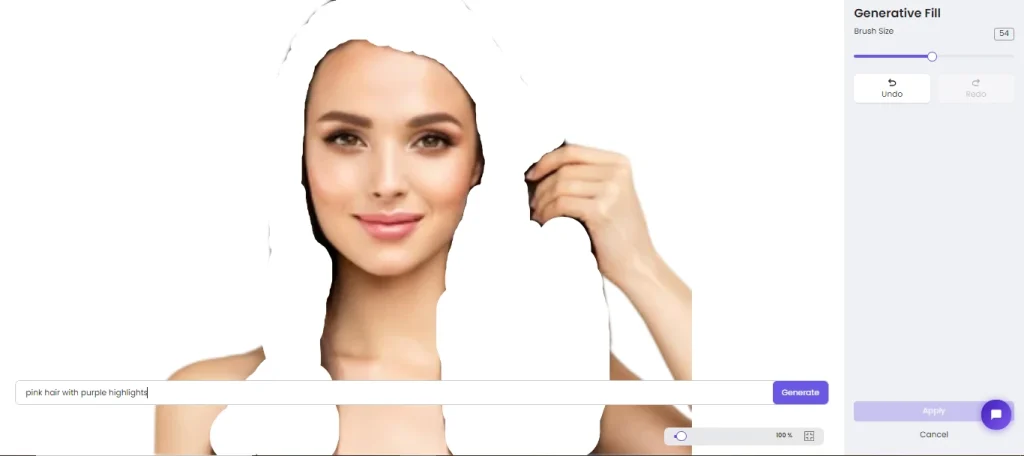
Step 6: Generate.
To generate the new color, click on the Generate button and wait for a few seconds. The AI will process your photo and your prompt and create a new image with the changed hair color. You can see the result on the canvas.
If you are satisfied with the result, you can apply the changes to your photo by clicking on the Apply button. This will merge the new color with your photo and exit the generative fill mode. You can also undo the changes by clicking on the Undo button, or generate a different color by clicking on the Generate button again.
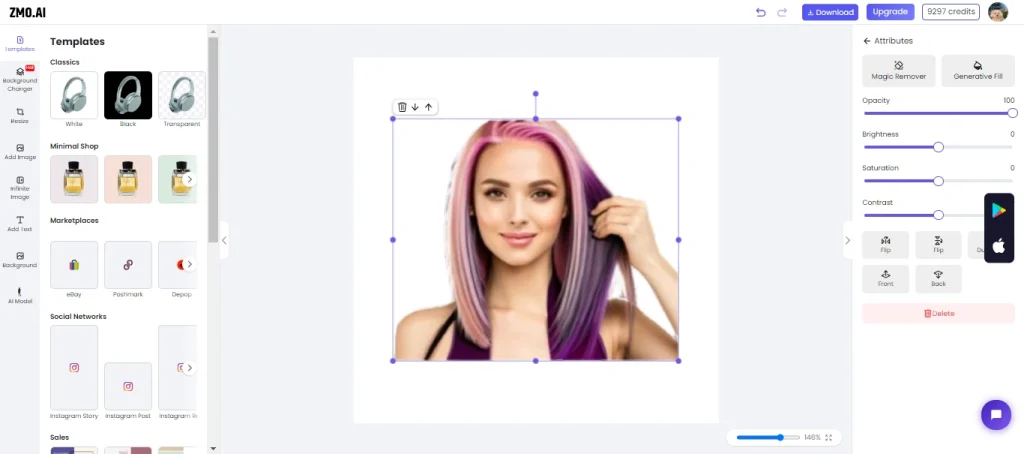
Step 7: Download.
To download your photo, click on the Download button.
Conclusion
Changing hair color in Photoshop or online is a fun and easy way to experiment with your look and express your personality. Whether you want to try a natural or a fantasy color, you can do it with a few simple steps and tools. We hope that this article has helped you learn how to change hair color in Photoshop and online and that you have enjoyed the process. If you have any questions or feedback, feel free to leave a comment below.